We’re currently performing technical maintenance. Some features may be temporarily unavailable. Thank you for your understanding.
Installing a Sink: How to Install a Sink on a Countertop
If you want to save money and test your skills, this article will guide you step by step on how to install a countertop sink, what tools and materials you will need, what to pay attention to during the process, and in which cases it’s better to trust the installation to a professional.
Installing a sink on a countertop is an important stage in a kitchen or bathroom renovation. Although at first glance the task may seem complicated, with proper preparation and a careful approach, even DIY enthusiasts can manage it. Installing a sink with a vanity unit or a standalone model requires high precision and attention to detail to ensure not only functionality but also an aesthetic appearance.
For successful completion, it is necessary to prepare all the tools and materials in advance, take accurate measurements, and carefully plan each step. Proper preparation helps to avoid mistakes that could lead to leaks, furniture damage, or additional costs for rework.
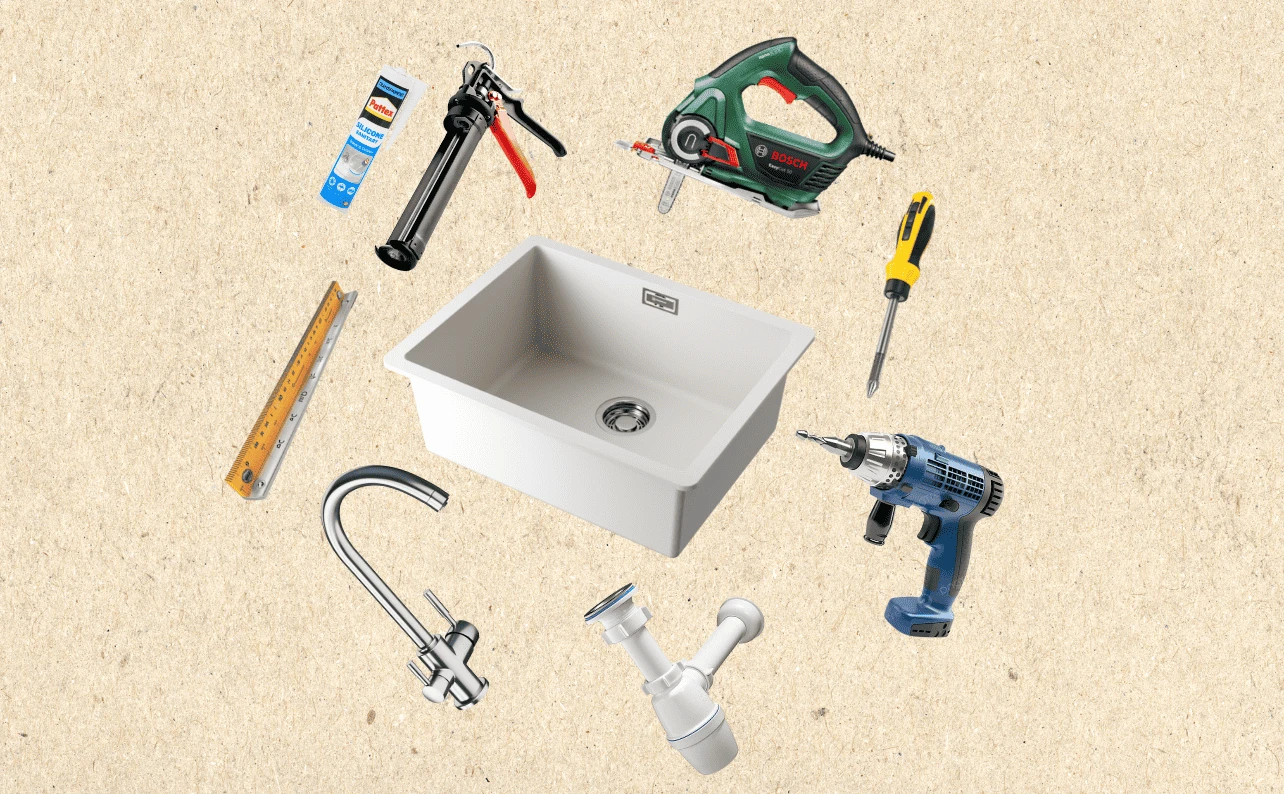
Tools and Materials Needed for Sink Installation
For successful sink installation on a cabinet, you will need:
Tools:
✔︎ Drill
Needed to create holes for the sink and mounting clips.
✔︎ Screwdriver
Used to secure screws and mounting clips.
✔︎ Caulking Gun
Used to apply silicone sealant.
✔︎ Jigsaw
Needed to cut the hole in the countertop.
Materials:
✔︎ Sink
The main component of the installation.
✔︎ Drain Kit
Includes the siphon and other necessary components.
✔︎ Ruler and Measuring Tape
Used to mark accurate cutting lines and measurements.
✔︎ Silicone Sealant
Designed to seal the edge of the sink.
✔︎ Plumbing Sealant
Used to seal connections.
✔︎ Cloth
Needed to clean the work surface before applying sealant.
✔︎ Pencil
Used to trace the outline of the sink.
Step-by-Step Guide to Installing a Sink
Preparation and measurement.
First, ensure you have all the necessary tools and materials at hand. Then place the sink upside down on the countertop and check that it is properly centered over the cabinet. Trace the outline of the sink with a pencil to mark where the hole will be cut.
Drilling the hole for the sink.
After drawing the cutting line, drill a hole in each corner inside the cutting line. Use a jigsaw to cut along the lines between the holes. Remove the cut-out section and insert the sink into the hole to check if it fits properly.
Installing accessories.
Next, install the sink accessories, especially the drain kit and faucet. If using a sprayer or garbage disposal, install these accessories now.
Surface preparation and applying sealant.
Before securing the sink, it is essential to clean the area around the hole to remove dust and debris. Apply a solid bead of silicone sealant around the perimeter. This sealant will act as a gasket to prevent water leaks.
Installing the sink.
Then carefully lower the sink into place, ensuring not to smear the sealant. Quickly wipe off any excess sealant. If the sealant has already hardened, use a scraper to carefully remove it from the countertop.
Securing with mounting clips.
The next important step is installing the mounting clips. Insert the clips into the channel, spacing them evenly around the perimeter. Tighten the clips evenly around the perimeter until the sink is securely seated. Avoid over-tightening the screws.
Connecting the water supply and checking for leaks.
Once the installation of the mounting clips is complete, the final step is to connect the accessories. Connect all the water pipes and install the sprayer and garbage disposal if using. Turn on the water and check for leaks.If recommended by your sink manufacturer, apply a small bead of sealant around the perimeter of the sink on the countertop for extra protection.
Tips for Successful Sink Installation
Accurate Measurements:
Always double-check all measurements before drilling or cutting. Mistakes can be costly and time-consuming to fix. Proper measurement is the foundation of a successful installation.
Cleanliness:
Thoroughly clean the work area before applying sealant and installing the sink. Dust and debris can prevent the sealant from adhering properly.
Thorough Inspection:
After installation, always check all connections and accessories for leaks. Checking before use prevents future problems and repairs.
Using Quality Sealant:
Use high-quality silicone sealant to ensure long-term protection against water leaks. Quality sealant prevents seepage and extends the lifespan of your installation.

Common Mistakes in Sink Installation
Some of the most common mistakes include insufficient or poor sealing, which can cause water leakage, incorrect measurement of the opening, which can lead to fitting and stability problems, and also over-tightening the clips, which may damage the sink or countertop. Another frequent mistake is using inappropriate or poor-quality materials (such as sealant), which can shorten the lifespan of the entire installation. Inadequate preparation of the work surface before installation can also lead to issues with fastening and sealing. Always follow the manufacturer's instructions, as ignoring specific guidelines may result in improper installation and loss of warranty. Each manufacturer may have different installation requirements that need to be followed. If you are unsure of how to proceed, it is worth considering the help of a professional, who will ensure a smooth installation with a guarantee of quality results. You can easily find experts who can help you with this on the WeCan platform, quickly and for free.
By following these steps and recommendations, you ensure that your sink installation on the countertop will be successful and reliable in the long term. Be careful, consistent, and proceed step by step according to the instructions. This way, you will achieve results you can be proud of. Careful work and the right tools are the foundation of a successful installation that will serve you for many years.